
Trustd MTD will keep your business, mobiles, employees and data secure from cyber criminals. In order to protect your business, there are a few quick and easy steps to follow.
If you’re only protecting a few devices, you only need to follow Step 1 and Step 2
- (Optional) Bulk enrol devices
- (Optional) Microsoft Entra – Bulk enrol
- (Optional) Microsoft Intune – Automatic Enrolment
- (Optional) Microsoft Intune – Automatic VPN Configuration
- (Optional) Microsoft Intune – Automatic Content Blocker Configuration for Supervised iOS
- (Optional) Microsoft Intune Zero-touch protection for Supervised iOS
- (Optional) Microsoft Intune Zero-touch protection for Android
- (Optional) Bulk enrol via an MDM
- (Optional) Microsoft Entra – Zero-trust conditional access
- (Optional) Microsoft Intune – Zero-trust conditional access
- (Optional) Reporting and notifications
Step 1 – Login to Trustd MTD for the first time
- Search your mailbox for an email from “noreply@control.traced.app” with the subject “Trustd console sign in invitation“
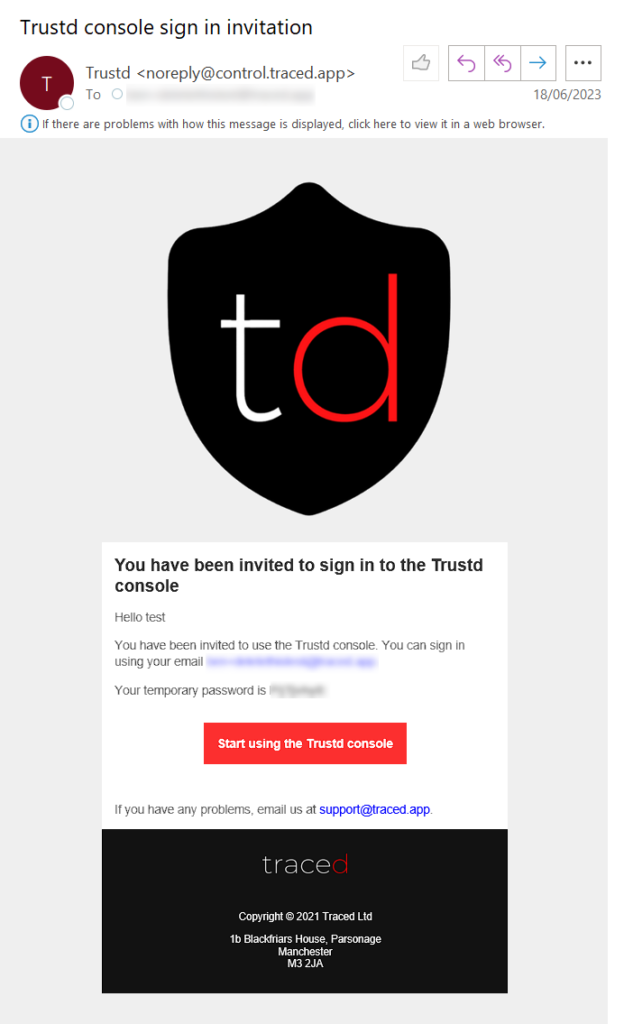
- Press “Start using the Trustd console” and sign in with your email and the temporary password from the email in the previous step.
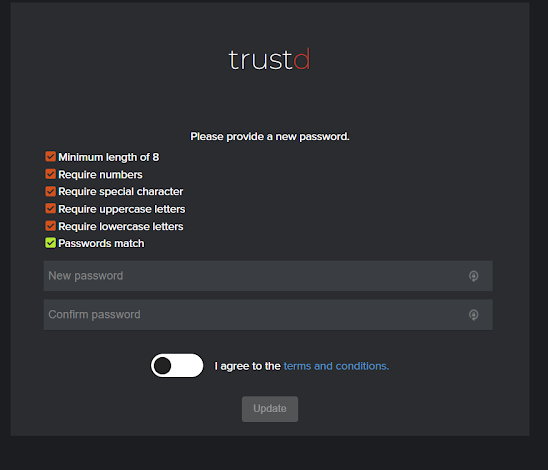
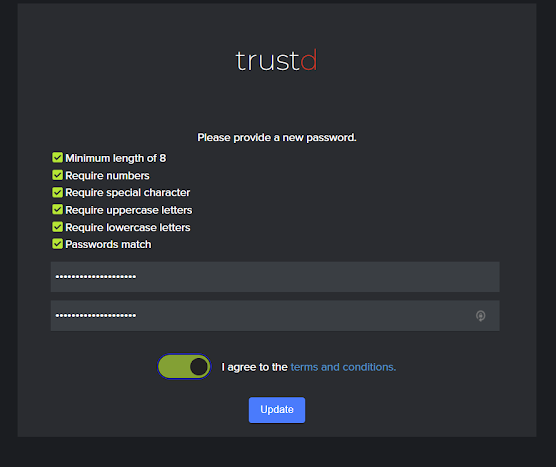
- Set a unique password, agree to our terms and conditions, then press “Update“
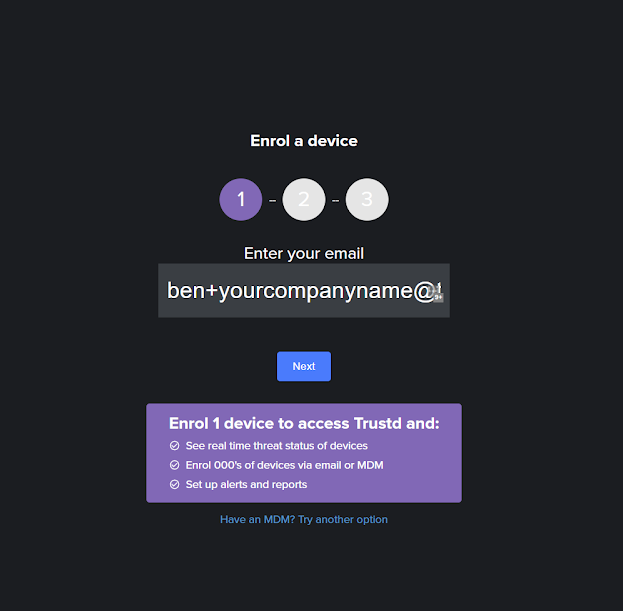
Step 2 – Add your first device
- Login to Trustd MTD with the new password you set in step 1
- Enter the email address for the first user you wish to protect, then press “Next”
Note: If you are using an MDM to deploy the Trustd app to your first device, press the “Have an MDM?” button and skip to “(Optional) Bulk enrol devices”.
- On the mobile device that you wish to protect, follow one of these instructions:
- iOS: https://traced.app/support/set-up-traced-for-ios/
- Android: https://traced.app/support/set-up-traced-for-android/

- Once your device is reporting “protected”, you’re all set. You can return to the Trustd MTD console and hit “Done” if you wanted to familiarise yourself with the dashboard, or if you want to protect more devices, follow the instructions in the previous section for each device.
Note: If you’re enrolling more than 10 devices, refer to “(Optional) Bulk enrol devices”.

(Optional) Bulk enrol devices
If you would like to add multiple devices at once, there are a number of options available. To see these options, navigate to “Devices” -> “Import” in the Trustd MTD dashboard.
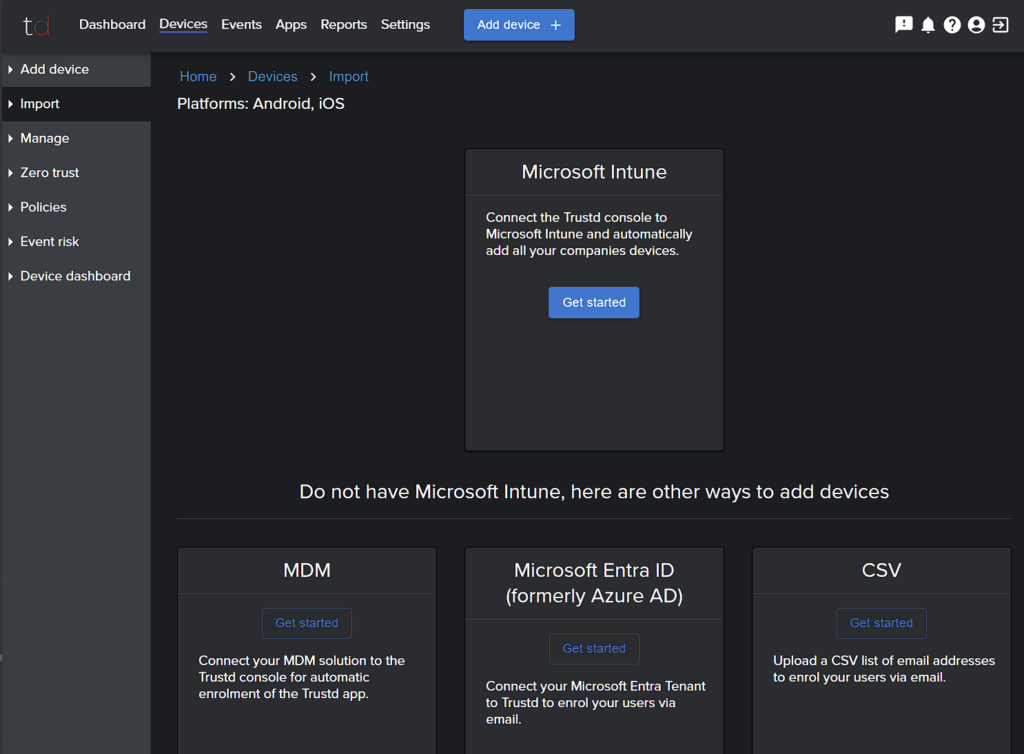
If you don’t use Microsoft Entra ID, Microsoft Intune or another MDM, then you simply need to hit “Get Started” under the “CSV” header and follow the instructions to upload a list of emails to be invited.
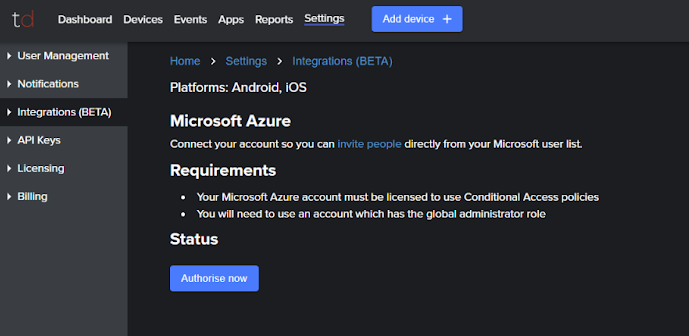
(Optional) Bulk enrol via Microsoft Entra ID (formerly Azure AD)
If you’d like to bulk enrol your Microsoft Entra ID users via email, follow these steps:
- Hit “Get Started” under “Microsoft Entra ID (formerly Azure AD)” in “Devices” > “Import” in the Trustd MTD dashboard.
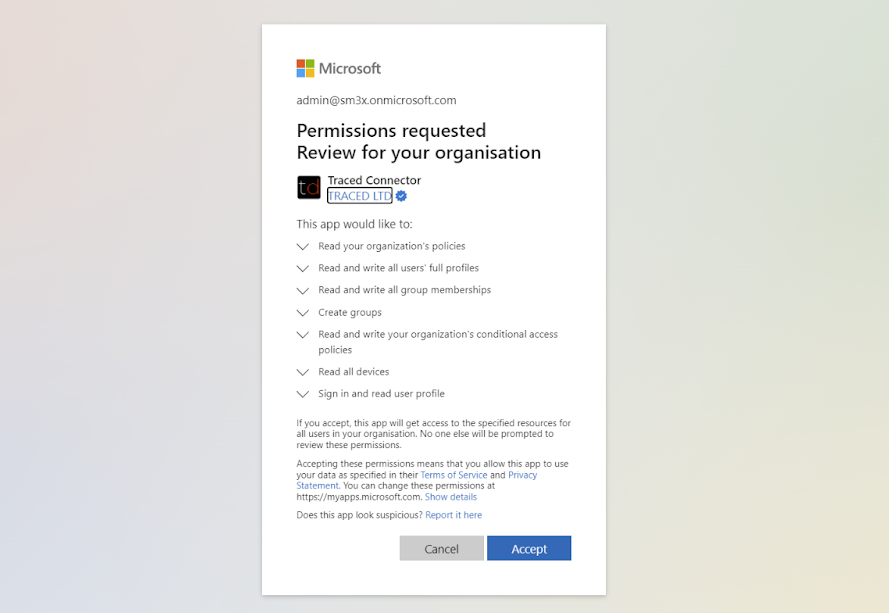
- If you haven’t already done so, click the “authorise us” link to integrate Trustd MTD with Entra ID.

- Check that your Microsoft user and tenant meet the requirements section, and if so, press “Authorise Now”.
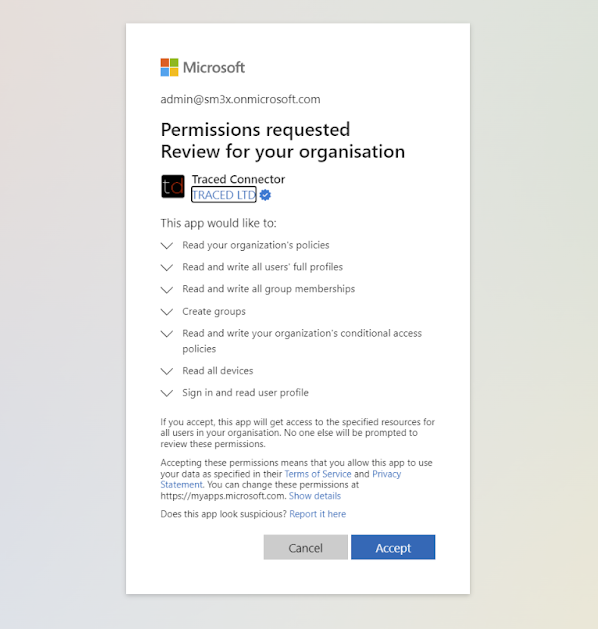
- Authenticate with your Microsoft credentials and press “Accept” to link Trustd MTD with your Entra ID Tenant.
- Press the “Invite people” link then “List Users”
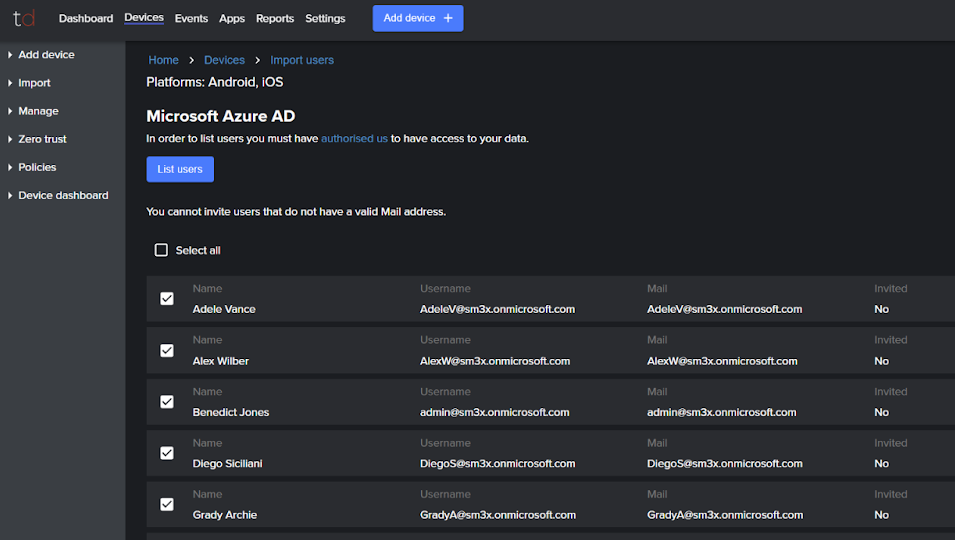
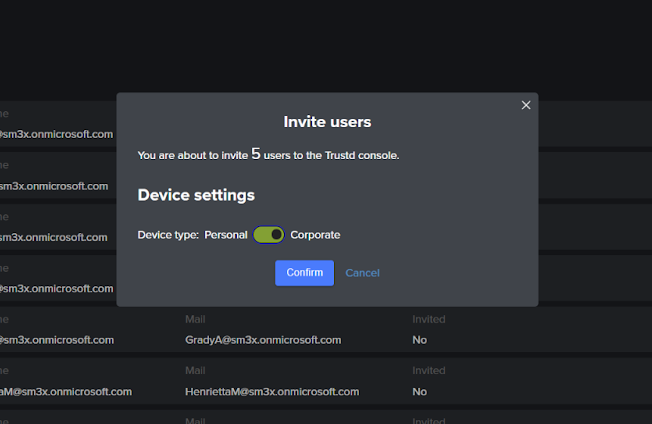
- From the list, select the users you want to invite, then click “Invite Selected Users”.
- Select Personal or Corporate mode, depending upon who owns this device.
Note: for more information on the differences between these two modes, go to What my company can see.
- On the mobile devices that you wish to protect, the user should follow one of these instructions:
- iOS: https://traced.app/support/set-up-traced-for-ios/
- Android: https://traced.app/support/set-up-traced-for-android/
(Optional) Bulk enrol via Microsoft Intune
If you’d like to bulk enrol your devices via Microsoft Intune, follow these steps:
- (Optional) If you want to enable zero-touch protection and/or to reduce the steps users need to take in-app to get started, go to “Devices” > “Policies” > “Enrolment” and “Edit Policy” and toggle on “Skip terms and conditions on device enrolment”.
- Hit “Get Started” under “Microsoft Intune” in the page from “Devices” -> “Import” in the Trustd MTD dashboard.
- Select which platforms you plan to protect.
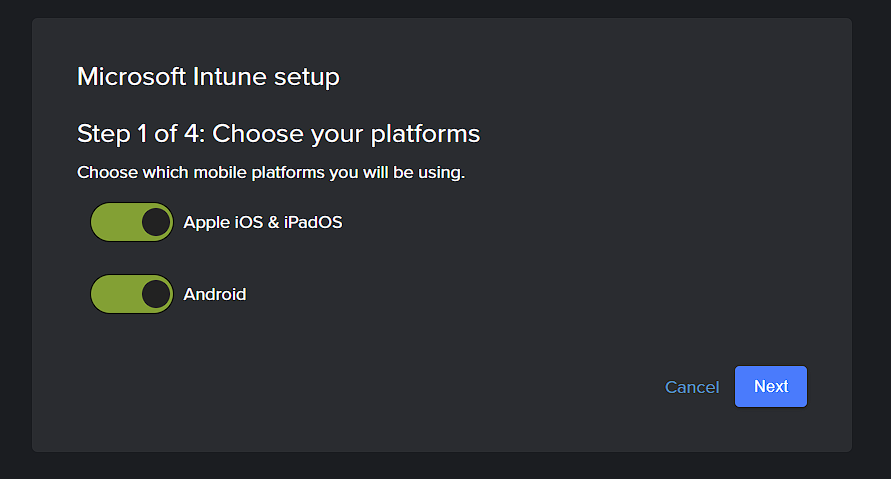
- Press “Next”.
- (Optional) If you want to enable zero-touch protection and/or to reduce the steps users need to take in-app to get started, toggle on “Skip terms and conditions on device enrolment”.
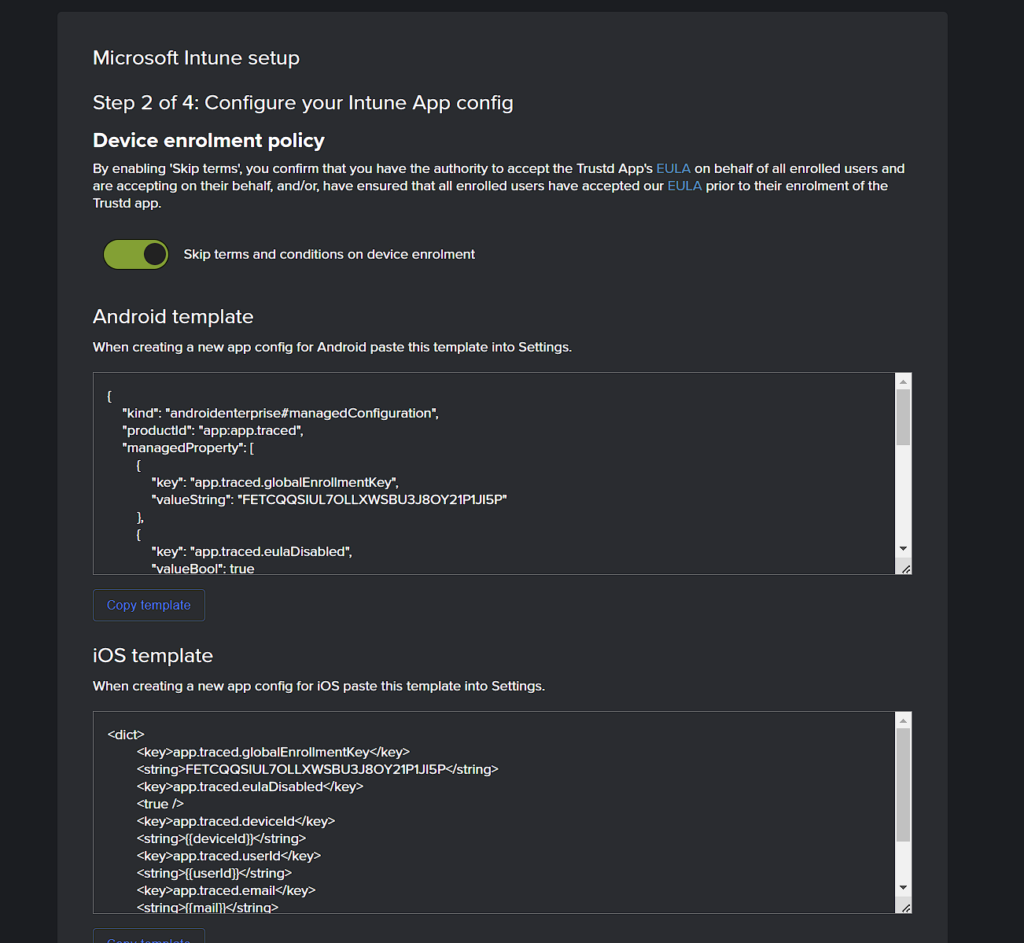
- If you’re protecting only Apple iOS devices, skip to step 7 below. Otherwise, add the Trustd app for Android to Microsoft Intune as a Managed App from the Google PlayStore: https://play.google.com/store/apps/details?id=app.traced&hl=en_GB&gl=US
- Create a Managed Devices – App Configuration Policy for the Android app. When prompted select “Configuration settings format” choose “Enter JSON Data” and copy and paste the contents of the Android template section from step 5.
- If you’re protecting only Android devices, skip to step 9 below. Otherwise, add the Trustd app for iOS to Microsoft Intune as a Managed App from the Apple AppStore: https://apps.apple.com/gb/app/id1519403888
- Create a Managed Devices – App Configuration Policy for the iOS app. When prompted to select “Configuration settings format” choose “Enter XML Data” and copy and paste the contents of the iOS template section in step 5.
- Click “Next“
- Follow the recommended guides to reduce enrolment steps for each device by automatically configuring Trustd’s protection in Microsoft Intune. Then press “Next”.
- Deploy the Trustd app to your device(s) through Microsoft Intune.
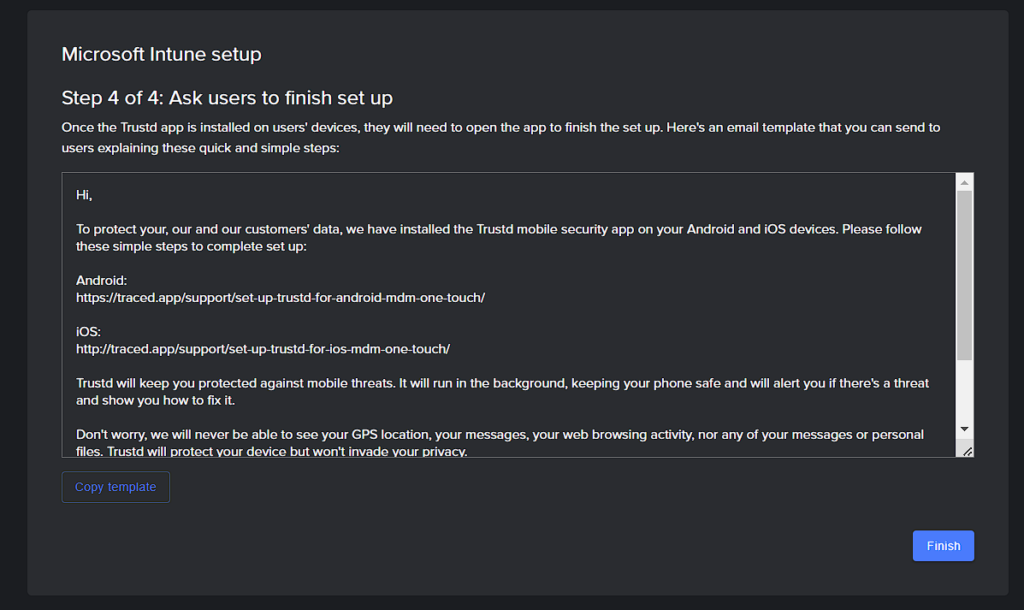
- You may want to copy and paste the email instructions to circulate amongst your users which will guide them through the few clicks that they’ll need to follow to protect their devices.
(Optional) Automatic VPN Configuration via Microsoft Intune
- Follow the instructions in this guide to automatically configure VPN-based Web Protection
(Optional) Automatic Content Blocker Configuration for Supervised iOS/iPadOS
- Login to Microsoft Intune (aka Microsoft Endpoint Manager)
- Navigate to Devices > iOS/iPad > Configuration Profiles
- Click “Create Profile” and choose:
- Platform: iOS / iPadOS
- Profile Type: Settings catalog
- Click “Create”
- At the “Configuration Settings” page, press “Add Settings”
- Search for “Safari Extension Settings”
- Select “Declarative Device Management preview Extension Settings” from the top pane
- Press “Select all these settings” from the bottom pane
- Press the X in the upper right corner of the right side bar
- Under “Managed Extensions” scroll to the right and select “Edit Instance”. Enter the following configuration:
- Allowed Domains: *
- Denied Domains: Press the “remove” symbol on the right
- Private Browsing: AlwaysOn
- State: AlwaysOn
- Managed Extensions: app.traced.contentBlocker0to50Krules (76NXTLSGPC)
- Save and apply the policy to users
(Optional) Zero-touch protection for iOS & iPadOS via Microsoft Intune
iOS Zero-touch part 1: Automatically Allow Notifications
- Login to Microsoft Intune (aka Microsoft Endpoint Manager)
- Navigate to Devices > iOS/iPad > Configuration Profiles
- Click “Create Profile” and choose:
- Platform: iOS / iPadOS
- Profile Type: Templates
- Template Name: Device Features
- Click “Create”
- At the “Configuration Settings” page, input the following configuration:
- App Notifications: Add
- App Bundle ID: app.traced
- App Name: Trustd Mobile Security
- Publisher: Traced Ltd
- Notifications: Enable
- Show in Notifications Centre: Enable
- Show on Lock Screen: Enable
- Alert Type: Banner
- Badges App Icon: Enable
- App Notifications: Add
Part 2: Enable the Content Filter Web Protection:
IMPORTANT: Running the Content Filter and the On-Device VPN is not supported. Before proceeding with the below steps, ensure to remove the app.traced VPN Configuration Profile from any Supervised iOS devices to which the Configuration Profile created below will apply.
- Email support@traced.app to request the Content Filter MDM Configuration Profile.
- Login to Microsoft Intune (aka Microsoft Endpoint Manager)
- Navigate to Devices -> iOS/iPad -> Configuration Profiles
- Click “Create Profile” choose:
- Platform: iOS / iPadOS
- Profile Type: Templates
- Template Name: Custom
- Upload the file obtained from the Traced support team in Step 1
- Save the configuration and apply it to devices.
(Optional) Zero-touch protection for Android via Microsoft Intune
- Edit the Configuration Settings of the Device Restrictions Configuration Policy that was created in the “Automatic VPN Configuration via Microsoft Intune” section above.
- Under “General” > “Fully managed…” set “Default permission policy ” to “Auto-grant”
You can also use the Samsung Knox Service Plugin app to enable zero-touch deployment to Android apps. Before following these settings, make sure that your devices have a Knox version >3.0 in this list here and your environment meets the minimum requirements listed here.
- Login to Microsoft Intune
- Navigate to apps > Android
- Press “Add”
- Select “Managed Google Play App”
- Press “Select”
- Search for “Knox Service Plugin”
- Select “Knox Service Plugin”
- Press “Select” > “Sync”
- Navigate back to apps > Android
- Select “Knox Service Plugin”
- If you don’t see it yet, make a cup of tea, then hit “Refresh”
- Press “Properties”
- Press “edit” next to Assignments
- Choose the desired assignments
- Press “Review & Save”
- Navigate to Devices > Android > Configuration Profiles
- Press “Create profile”
- Select “Android Enterprise”
- Select “OEM Config”
- Press “Create”
- Name the Policy “Knox Configuration”
- Press “select an OEMConfig app”
- Select “Knox Service Plugin”
- Press “Select”
- Press “Next”
- Press “Configure” next to “Device-wide policies”
- Set “Enable device policy controls” to “true”
- Press “Application management policies”
- Next to “Application management controls” select “true”
- Next to “Battery optimization allowlist” add:
- app.traced
- any other apps, separated by commas, to grant the Unrestricted battery optimization policy to.
- Choose the desired assignments
- Press “Save”
(Optional) Bulk enrol via an MDM
If you’d like to bulk enrol your devices via an MDM, follow these steps:
- (Optional) If you want to enable zero-touch protection and/or to reduce the steps users need to take in-app to get started, go to “Devices” > “Policies” > “Enrolment” and “Edit Policy” and toggle on “Skip terms and conditions on device enrolment”.
- Hit “Get Started” under “MDM” in the page from “Devices” -> “Import“ in the Trustd MTD dashboard.
- Enter the configuration values for the managed app configuration into your MDM’s app configuration template.
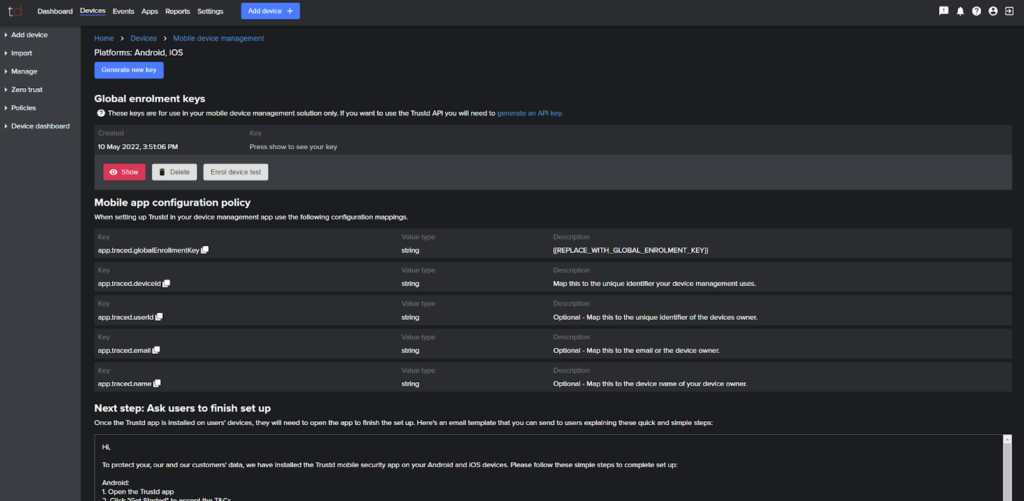
Note: make sure you replace the “app.traced.globalEnrollmentKey” value with the key shown by pressing the pink “Show” button.
4. Deploy the app out to your devices
5. You may want to copy and paste the email instructions to circulate amongst your users which will guide them through the few clicks that they’ll need to follow to protect their devices.
(Optional) Microsoft Entra – Setup zero-trust conditional access
Note: for new setups, we recommend using the new “Microsoft Intune -Zero-trust conditional access” capability.
There are 2 modes of zero-trust in Trustd MTD: User-based and Device-based. To help you to choose the right mode for you, here’s a description of both:
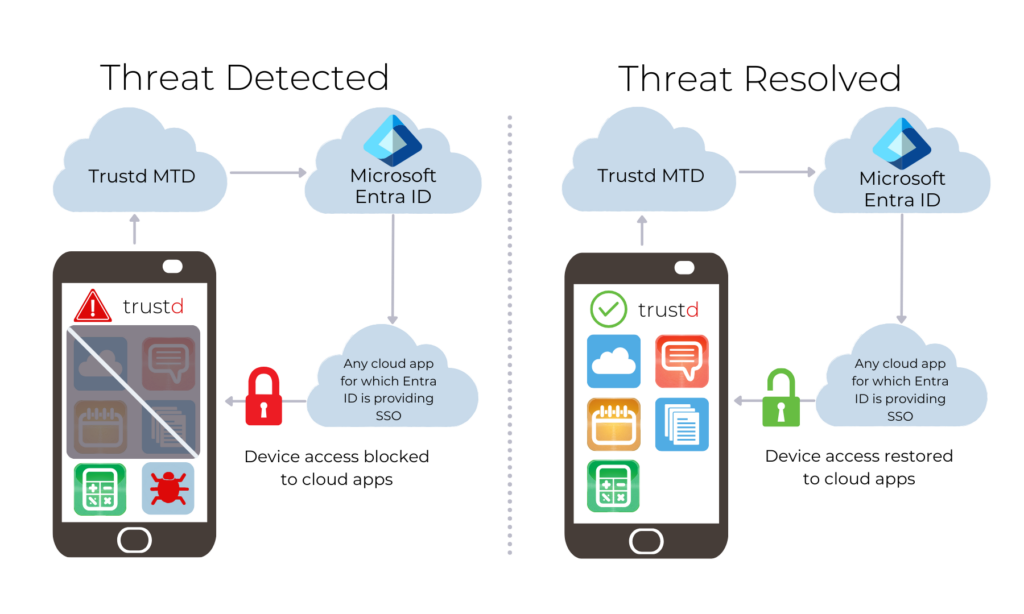
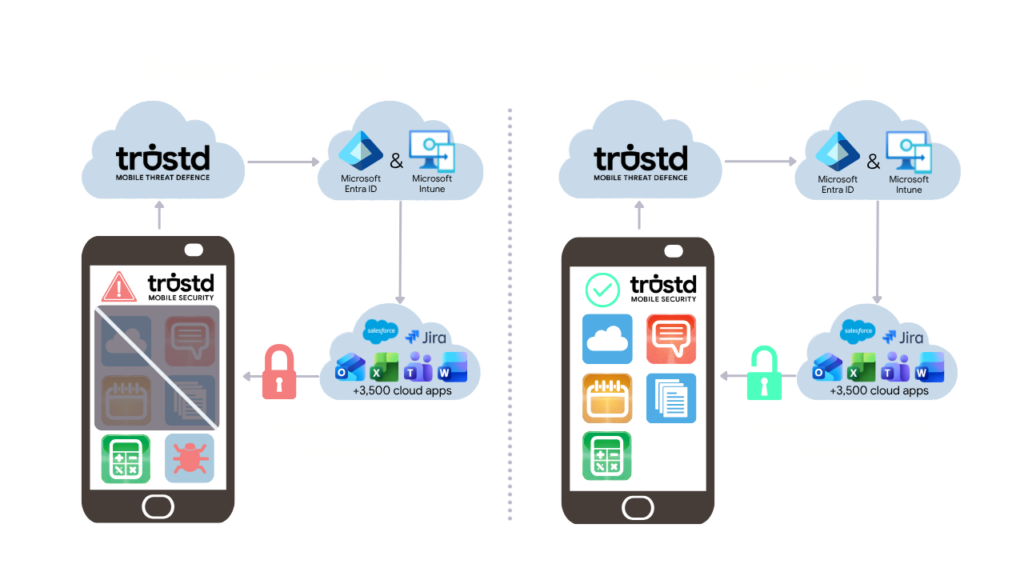
Device-based Zero Trust:
Device-based Zero Trust allows access to Office 365 apps from all Android, iOS and iPadOS devices which the Trustd App has checked and not detected any high risk issues. Access to Office 365 apps will be blocked from all Android, iOS and iPadOS devices which either have not been scanned by the Trustd App (e.g. the Trustd app has not been installed and enrolled) or have been assessed as “High Risk” by the Trustd app (e.g. Are running a vulnerable OS or have a malware app installed).
Device-based Zero Trust requires devices to be registered with Entra ID (e.g. via the Company Portal or Authenticator app). This mode is best for companies who have any combination of: company-owned devices, managed devices, managed apps and/or allow BYOD.
Here’s a diagram of how Device-based Zero Trust works:
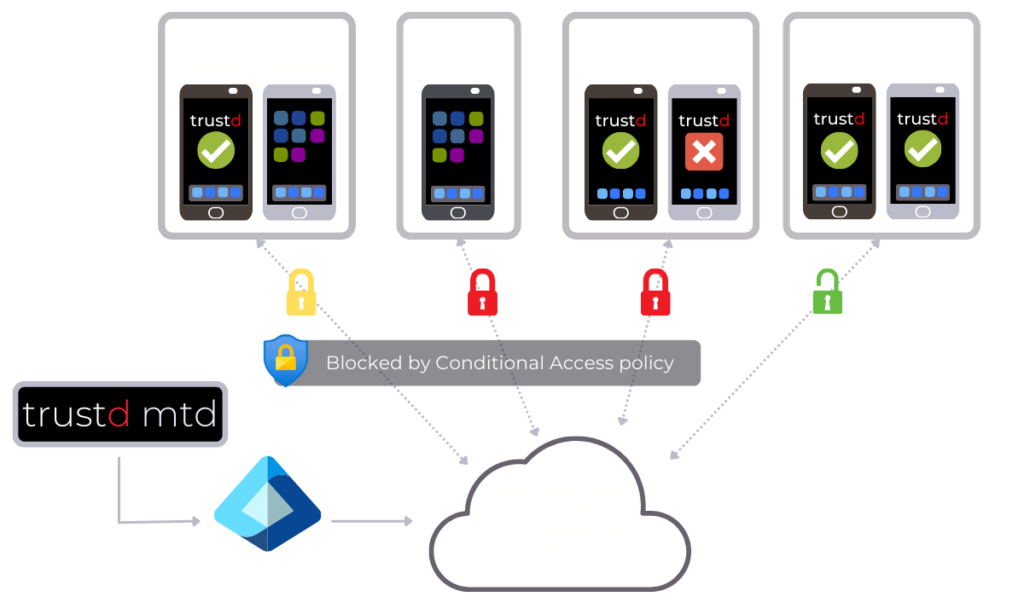
User-based Zero Trust:
User-based Zero Trust works by allowing access to all apps for which Microsoft Entra ID is providing SSO from users whose Android, iOS and iPadOS devices have had a device checked by the Trustd App and/or none of their device have been assessed as “High Risk”.
This mode is best for organisations who do not manage their devices nor apps.
To help explain the scenarios that Trustd will restrict access to company data from users with untrusted mobile devices, please refer to the below diagram:
If you would like to setup Trustd MTD to automatically restrict access to company data from untrusted devices or users, follow the steps for the mode that’s best for you below:
Setting up Zero Trust:
- Navigate to “Devices” > Zero Trust
- Under “Microsoft Entra” press Continue
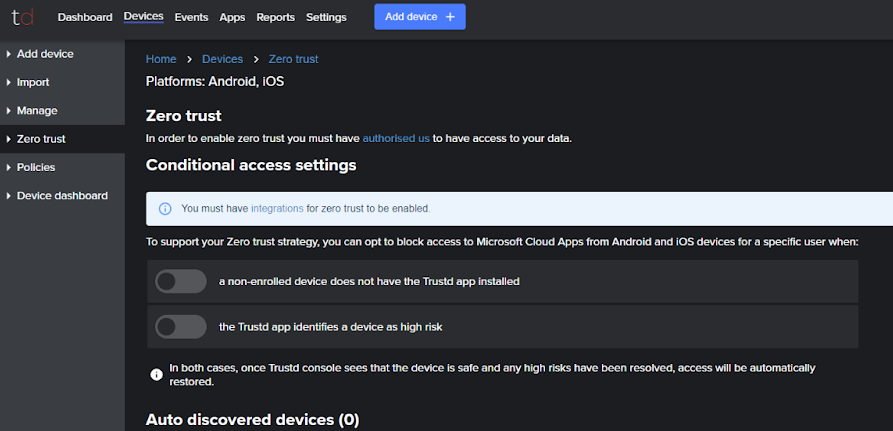
- If you haven’t already linked Trustd MTD with your Microsoft Tenant, “Integrations”, then click “Authorise Now”. Otherwise, you can skip to either the “Setting up Device-based Zero Trust” or “Setting up User-based Zero Trust” steps below:
- Authenticate with your Microsoft credentials and press “Accept” to link Trustd MTD with your Entra ID Tenant.
- Note: You may want to check these by looking for the Entra ID Group “Trustd conditional access policy” and Conditional Access Policy “Access to Cloud requires Trustd on mobile”
Setting up Device-based Zero Trust:
- Navigate to Devices > Zero Trust
- You can now enable “Device-based Zero trust is enabled”
- Read the prompt carefully.
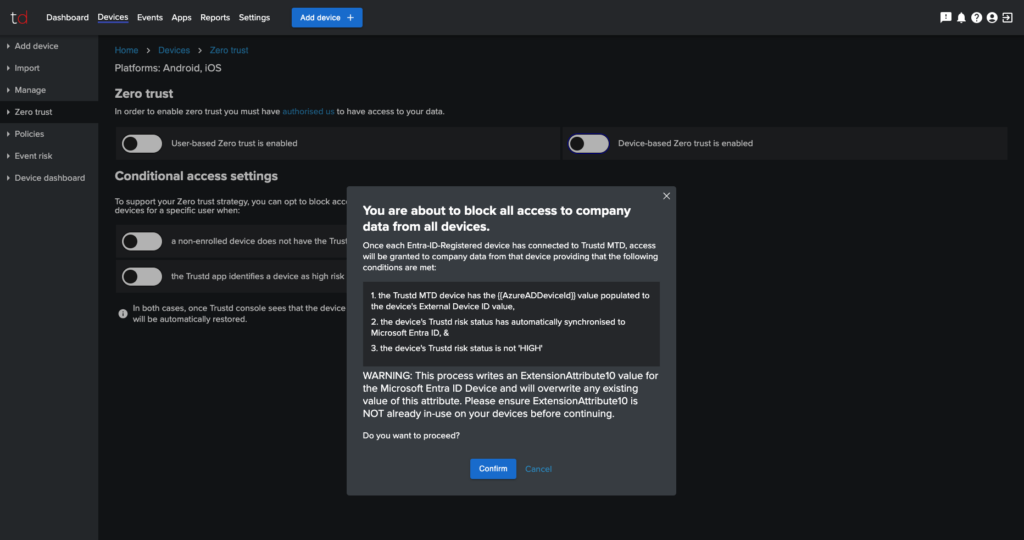
- If you’re happy to proceed, press “Confirm”
- Wait for Trustd MTD to perform it’s initial synchronization with Microsoft Entra ID. This will include Synchronizing the risk rating of your devices with Microsoft Entra ID.
During the initial Synchronization, you may receive a failure message. This is typically caused if Trustd MTD is unable to synchronize the Trustd Risk State of all Devices on the account with Microsoft Entra ID. In this case, check the “External Device ID” values of devices and ensure that they are the {{AzureADDeviceID}} value. There are a few options available at this point:
- If some devices do not have the {{AzureADDeviceID}} value mapped to the External Device ID and you require them to be updated, please contact Traced support at support@traced.app.
- If some devices do not have the {{AzureADDeviceID}} value mapped to the External Device ID and need deleting, then you can delete them. Once deleted, Disable the “Device-based Zero trust is enabled” toggle and re-enable it to re-run the initial device risk sync.
- if you’re happy to proceed anyway (and understanding those devices which do not have their risk status synced with Trustd MTD and/or are high risk will have their access restricted), then continue with the following:
- In Microsoft Entra ID, nvaigate to “Conditional Access” > “Policies“
- Select “Device-based Trustd Zero Trust Conditional Access”
- Toggle “Enable Policy” to “On”
Setting up User-based Zero Trust:
- Navigate to Devices > Zero Trust
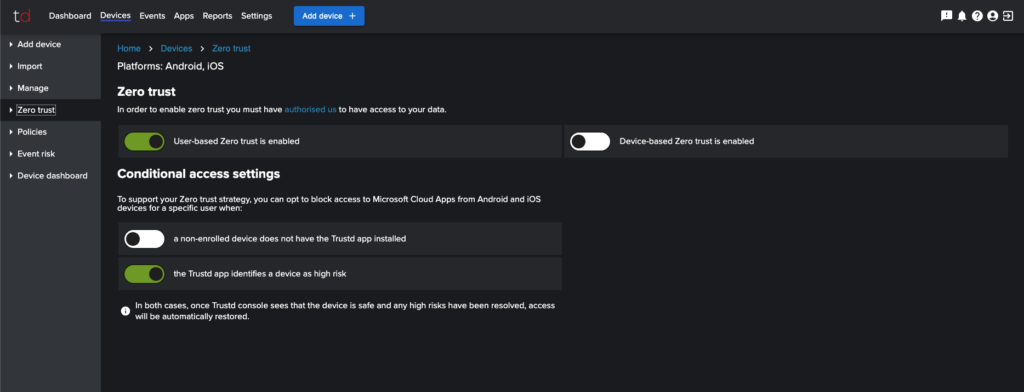
- You can now enable “User-based Zero trust is enabled” and choose when you want Trustd to automatically revoke access to users from mobile devices from the toggles below.
See what the settings in the Zero Trust page do when turned on.
(Optional) Microsoft Intune – Zero Trust Conditional Access
Once you have enabled the Trustd Mobile Connector App in integrations and in Microsoft Intune, follow the below instructions:
- Choose “Devices” from the top bar
- Choose the “Zero Trust” from the left bar
- Under “Intune Zero Trust” press “Continue”
- Toggle on the “Enable Intune zero trust”
(Optional) Reporting and Notifications
Trustd MTD has a number of reporting and notification options prebuilt.
You can:
- setup notifications at https://control.traced.app/settings/notifications,
- schedule email reports at https://control.traced.app/reports/scheduled, and
- pull compliance reports at https://control.traced.app/reports/compliance?type=cyber-essentials.